
How What Why
How to Add Patches to a DIY Face Mask
Mar
DIY face masks became popular because they let people combine function with personal style. Even now, many crafters enjoy making cloth masks that reflect their personality, hobbies, team spirit, or favorite colors. One of the easiest ways to upgrade a plain fabric mask is by adding embroidered patches.
If you have ever wondered how to use patches in face mask, the process is simpler than it looks. With the right patch, a good placement choice, and a safe attachment method, you can create a mask that feels more custom and unique. In this guide, you will learn what patching a mask means, how to choose the best patch, how to attach it, and how to keep the finished mask comfortable and wearable.
What Does “Patches in a DIY Face Mask” Mean?
In simple terms, patches are decorative pieces of fabric, usually embroidered or printed, that can be attached to another fabric item. When used on a cloth mask, they add a custom design without requiring advanced sewing or embroidery skills.
The most common patch types include:
- Sew-on patches: These patches are stitched directly onto the fabric. They are often the most durable option and work well for reusable cloth masks.
- Iron-on patches: These have a heat-activated backing that sticks to fabric when pressed with an iron. They are convenient, but not every mask fabric can handle heat.
- Velcro-backed patches: These patches attach to a matching hook-and-loop base. They are less common for masks, but they can work for removable designs on larger fabric masks or costume-style projects.
When people talk about embroidered patches on face mask designs, they usually mean decorative additions for washable cloth masks, not disposable masks. The goal is style and personalization, while still keeping the mask comfortable and easy to wear.
Why Add Embroidered Patches to a Face Mask?
Adding patches to a mask is a small detail that can make a big visual difference. A simple mask can instantly look more creative with the right design.
Here are a few reasons people like making a DIY face mask with patches:
- Personal style and customization
A patch can show off your interests, favorite symbols, initials, or art style. - Team, club, or brand identity
Patches are a fun way to match a group theme, school club, small business look, or event design. - Making handmade masks look unique
Even basic masks can feel more polished when you add one carefully placed patch. - Reusing old patches creatively
If you have leftover or vintage patches, a mask can be a smart small-scale project to use them again.
For many crafters, custom face mask patches are a simple way to turn plain fabric into something more memorable.
Best Types of Embroidered Patches for Face Masks
Not every patch works well on a mask. Since masks sit close to the face, the patch needs to be light, soft enough, and properly sized.
When choosing decorative patches for face masks, keep these points in mind:
- Choose lightweight patches
Heavy patches can pull on the fabric and make the mask sit awkwardly. - Avoid thick or stiff materials
Very dense or rigid patches may reduce comfort, especially on curved mask surfaces. - Pick a smaller size
A patch that is too large can overpower the mask and make it harder to fold or shape correctly. - Check the backing
Some patches have rough or bulky backing materials that may irritate the skin if the inside of the mask is not lined well.
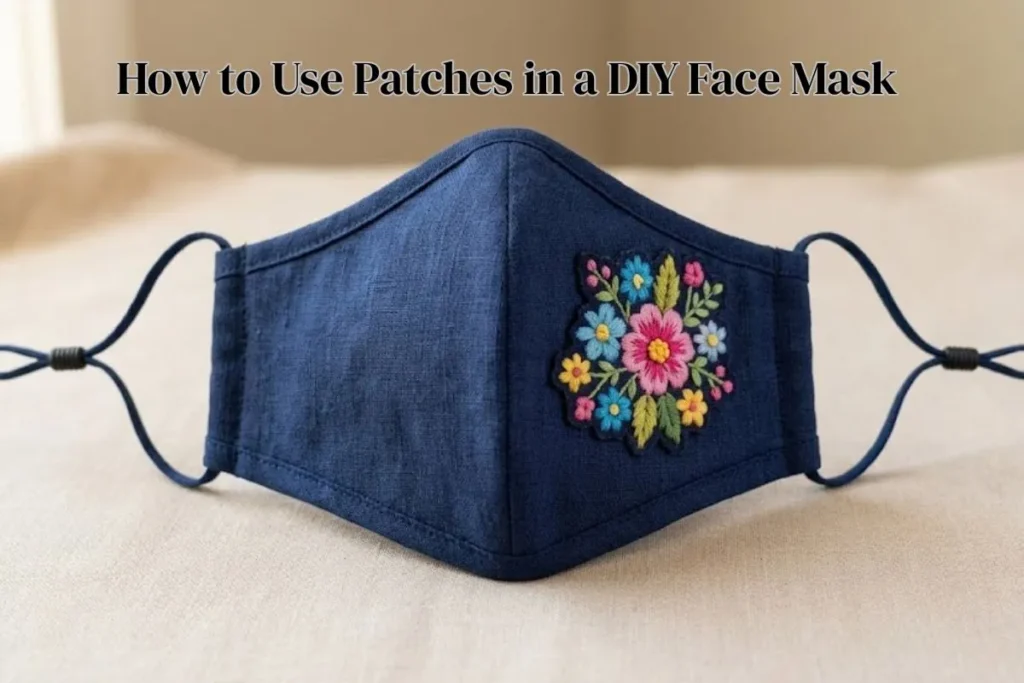
Match the design to the fabric
Look for patch colors, thread textures, and themes that work with the mask material. Floral patterns, initials, cartoon icons, vintage badges, and minimal monochrome shapes are all popular choices.
If your goal is a wearable and comfortable mask, think of the patch as an accent rather than the main structure.
Things You Need Before You Start
Before you begin, gather your materials so the process goes smoothly.
You will need:
-
A plain fabric face mask
-
An embroidered patch
-
Needle and thread or fabric glue
-
Scissors
-
Pins or clips
-
An iron, if using iron-on patches
-
A protective cloth for ironing
If possible, also keep a scrap piece of similar fabric nearby. Testing first can help you avoid mistakes, especially when using glue or heat.
Best Placement Ideas for Patches on a Face Mask
Placement matters more than many people expect. A patch can look great but still feel awkward if it sits in the wrong area.
Here are some easy placement ideas for a personalized face mask:
- Side corner placement
This is one of the best options. A patch near the outer cheek area adds visual interest without dominating the whole mask. - Lower edge placement
A small patch near the bottom edge can look stylish and balanced. - Small centered design
A tiny patch in the center can work if it is very light and does not affect comfort. - Minimal single-patch look
Sometimes one simple patch is enough. A cleaner design often looks better than too many details on a small surface.
Try to avoid placing patches where they may affect breathing, folding, or the natural shape of the mask. The nose and mouth area should stay as comfortable and unobstructed as possible.
How to Attach a Patch to a Fabric Face Mask
There are three common ways to attach patches to a cloth mask: sewing, fabric glue, and ironing. The best method depends on the patch type and the mask fabric.
Step-by-Step: How to Attach Patches to a DIY Face Mask
A. Sewing the Patch On
If you want the most reliable method, sewing is usually best. It is a strong choice for anyone searching for how to sew patches on fabric mask projects.
-
Place the patch where you want it.
-
Pin or clip it in place so it does not shift.
-
Thread your needle with a matching or invisible thread.
-
Stitch carefully around the edge of the patch using small, even stitches.
-
Securely tie off the thread on the inside.
-
Check the inside of the mask to make sure there are no rough knots or scratchy areas.
This method takes a little more time, but it usually holds up best through repeated wear and washing.
B. Using Fabric Glue
Fabric glue is useful if you want a quicker option or if the patch is light and decorative.
-
Lay the mask flat.
-
Put a little bit of fabric adhesive on the back of the patch.
-
Press the patch firmly onto the mask.
-
Smooth the edges so they lie flat.
- Follow the glue instructions and let it dry all the way.
-
Gently test the edges after drying to make sure the patch is secure.
This is one of the easiest answers to how to attach patches to a mask, but be careful not to use too much glue. Excess glue can soak through the fabric and create stiffness.
C. Using Iron-On Patches
Many crafters like iron on patches for masks because they are convenient, but you need to be careful with heat.
-
Read the patch instructions first.
-
Check whether the mask fabric can safely handle ironing.
-
Position the patch on the mask.
-
Place a protective cloth over it.
-
Press gently with the iron for the recommended time.
-
Let the mask cool fully before moving it.
-
Test the edges to make sure the bond has formed.
Iron-on patches can be helpful, but they are not ideal for every fabric. Delicate fabrics, stretchy blends, or layered masks may react poorly to heat. Testing on scrap fabric first is always smart.
Safety Tips for Wearing a Patched Face Mask
Style matters, but comfort and usability matter more. When learning how to use patches in a diy face mask, keep these practical safety points in mind:
- Keep the patch lightweight
A heavy patch can pull the mask out of shape and make it less comfortable to wear. - Keep the inside smooth
Any stitching, glue residue, or rough backing should not rub the skin. - Avoid thick layers over key areas
Do not stack heavy materials over the main breathing area. - Wash gently
Frequent rough washing can loosen patch edges or damage embroidery. - Check the attachment regularly
Before wearing the mask again, make sure the patch is still firmly attached.
It is also important to remember that decoration should never come before comfort, fit, or breathability.
DIY Face Mask Design Ideas with Patches
Need inspiration for your DIY face mask with patches project? Here are a few design ideas:
- Floral patch mask: A small flower or leaf patch works beautifully on pastel or neutral fabric.
- Cartoon patch mask: Fun for kids, themed events, or playful handmade gifts.
- Name or initial patch mask: Great for school, clubs, or simple personalization.
- Vintage-style patch mask: Use retro badges or old embroidered patches for a classic handmade look.
- Minimal monochrome patch mask: A black-on-black or white-on-neutral patch gives a clean, modern style.
- Seasonal or holiday-themed patch mask: Snowflakes, hearts, stars, pumpkins, or festive symbols can make the design feel timely and fun.
The best custom look is usually balanced, not crowded. One thoughtfully placed patch often looks more polished than several competing designs.
Common Mistakes to Avoid
A patch can improve a mask design, but a few small mistakes can reduce comfort or durability.
Watch out for these common problems:
-
Using oversized patches
-
Placing patches too close to the nose area
-
Choosing rough or stiff backing materials
-
Using too much glue
-
Ironing delicate fabrics at high heat
-
Ignoring washing instructions
-
Adding patches without checking how the mask folds and fits
A little planning before attaching the patch can save time and keep the finished mask looking neat.
Expert Tips for a Better Result
- A better result usually comes from small practical choices, not fancy materials.
- First, test the patch on scrap fabric before attaching it to the actual mask. This helps you see how the fabric reacts to stitching, glue, or heat.
- Second, prioritize comfort over decoration. A patch that looks perfect on the table may feel too stiff once the mask is worn.
- Third, choose skin-friendly, washable materials. Soft fabrics and quality thread usually perform better for reusable projects.
- Finally, remember that durability matters. Sewing may take longer, but it often gives the strongest finish for a mask that will be worn and washed more than once.
- These simple crafting habits make your project feel more thoughtful and dependable.